
Fuel pump sudden death
When I tried to start the engine, it cranked vigorously but there was no initial explosion. The last time I drove the car was about two weeks ago, and some kind of problem occurred during those two weeks. When the ignition was turned on, I could hear a clicking sound from the fuel pump relay, so there was no problem with the operation of the side that controls the pump. However, I could not hear the pump operation sound (which is designed to be energized for 2 seconds after the ignition is turned on), which I usually hear at the same time as the relay operation.
At this point, the pump was likely broken, but I checked the main relay and the resistor to see if there were other possibilities. The power supply to the fuel pump relay is switched by the main relay, so if the main relay breaks down, the fuel pump may not work. The main relay may have a problem where the contact side becomes loose, making the relay make a noise but not conducting electricity, so I tried replacing it with a spare part I had stored, but it did not improve the situation.
Possibility of resisto
The resistor is connected in parallel in the power supply circuit to the pump, and the wiring branching off from the pump goes into the ECU and is switched to earth only at low revolutions. In other words, the resistor is only active at low revolutions when it is earthed, limiting the current supplied to the pump. Due to this specification, if a malfunction such as a broken resistor occurs, power will not be supplied to the pump even when the engine is started.
- Checking the resistor is easy; just unplug the resistor coupler and short the two terminals. If it is shorted, the current supplied to the pump will not be limited even at low speeds, but the engine will start, so it is possible to fix it temporarily. Shorting the resistor coupler did not improve the situation, so it is almost certain that the fuel pump is the cause.

Fuel Pump Resistor
Check the pump operation
Just to be sure, remove the low pressure hose after the pressure regulator and confirm that no fuel comes out when the ignition is on.
- Finally, I tried powering the pump directly from the battery using coupler 32, but no fuel came out, so I confirmed the pump was broken.
Incidentally, when I measured the resistance between the pump's terminals using coupler 32, it was about 25MΩ, meaning there was almost no continuity.
I suspect the slight continuity was due to the pump being submerged in gasoline.
According to my research, fresh high-octane gasoline typically has a resistance ranging from tens to hundreds of MΩ.
After about a month of oxidation, it drops to 10–50 MΩ, and if moisture is mixed in, it can go as low as 1 MΩ or even less.

Fuel pump inspection at coupler No. 32
Many Parts Discontinued
Only the fuel pump broke, but when you buy a tank, the pump and fuel hose are included as a set, or the hose around the cut valve, which is no longer in production, is included, so it seems that many people replace the whole tank with a new one. The original fuel tank for the early model is no longer in production, and is now replaced by a later model tank.
The later model tank differs from the earlier model in several ways.
First, the two cut valves originally located at both ends are now combined into one and placed at the center.
In addition, the breather hose nipple has been repositioned.
I wanted to replace all the hoses as well, but all of them except the fuel hose are no longer in production, so in the end I was only able to purchase the tank.
I wanted to replace everything that could be replaced, so I additionally purchased a meter unit and a one-way valve.

* The red-colored parts are included in the fuel tank set (Tank Set, Fuel - 17013-SL0-306).
Price at purchase (March 2025)
| No | Part Number | Part Name | Unit price | Quantity | Price | Remarks |
|---|---|---|---|---|---|---|
| 4 | 17371-SM4-A02 | Valve, two-way (TEC) | 3,971 | 1 | ||
| 30 | 37800-SL0-305 | Meter unit, fuel (service use) | 9,515 | 1 | ||
| highlighted in red | 17013-SL0-306 | Tank set, fuel | 107,140 | 1 | ||
| 17 | 17651-SL0-000 | Tube, filler neck (1991-1995 model) | 3,245 | 0 | End of production in October 2022 | |
| 17 | 17651-SL0-930 | Tube, filler neck (1997 model) | 1,353 | 0 | End of production in January 2023 | |
| 19 | 17658-SL0-010 | Tube assembly, breather (1991-1995 model) | 1,573 | 0 | End of production in October 2022 | |
| 19 | 17658-SL0-930 | Tube assembly, breather (1997 model) | 1,353 | 0 | ||
| 27 | 17721-SL0-030 | Tube, Fuel Vent | 638 | 0 | End of production in January 2023 | |
| 25 | 17726-SL0-010 | Bracket, two-way valve | 0 | Discontinued | ||
| 56 | 95001-55080-30 | TUBE, FUEL 5.3X80 (95001-55001-60M) | 0 | Discontinued (※) | ||
| Total amount | ||||||
All prices shown are exclusive of tax.
* 95001-55080-30, 95001-55110-30, 95001-55135-30, and 95001-55325-30 have been integrated into 95001-55001-60M (a 1m general-purpose hose that can be cut to length), but production of the 95001-55001-60M into which they were integrated has also already been discontinued.
Loading...
| No | Part Number | Part Name | Unit price | Quantity | Price | Remarks |
|---|---|---|---|---|---|---|
| 4 | 17371-SM4-A02 | Valve, two-way (TEC) | 3,971 | 1 | ||
| 30 | 37800-SL0-305 | Meter unit, fuel (service use) | 9,515 | 1 | ||
| highlighted in red | 17013-SL0-306 | Tank set, fuel | 107,140 | 1 | ||
| 19 | 17658-SL0-930 | Tube assembly, breather (1997 model) | 1,353 | 1 | ||
| Total amount | ||||||
All prices shown include tax.
* Parts with blank Unit prices are either out of production or unavailable for order at the time of the survey.
* Even if a part has a Unit price displayed, it may no longer be in production.

17371-SM4-A02 Tank set, fuel
- The fuel tank itself. It comes with a fuel pump, fuel pipes, cut valve, etc. If you purchase it with the NA1 compatible part number (17013-SL0-306), it seems that the parts that do not fit the NA1, such as the return hose on the fuel filler side, have been removed, even though the price is the same as for the later model. The return hose on the fuel filler side is longer for the later model, so I thought that it might be usable if I cut it (this is just a guess).
- The fuel pump cover is smeared with a sticky substance. I think it's for rust prevention or insulation, but this kind of treatment is not done when replacing the pump alone, and it's not specifically mentioned in the maintenance manual, so I don't think it's that important.
- Meter unit and one-way valve. The hose and bracket connected to the one-way valve are no longer in production and cannot be purchased, so they will be reused.

Rust prevention treatment for fuel pump?

Meter unit and one-way valve
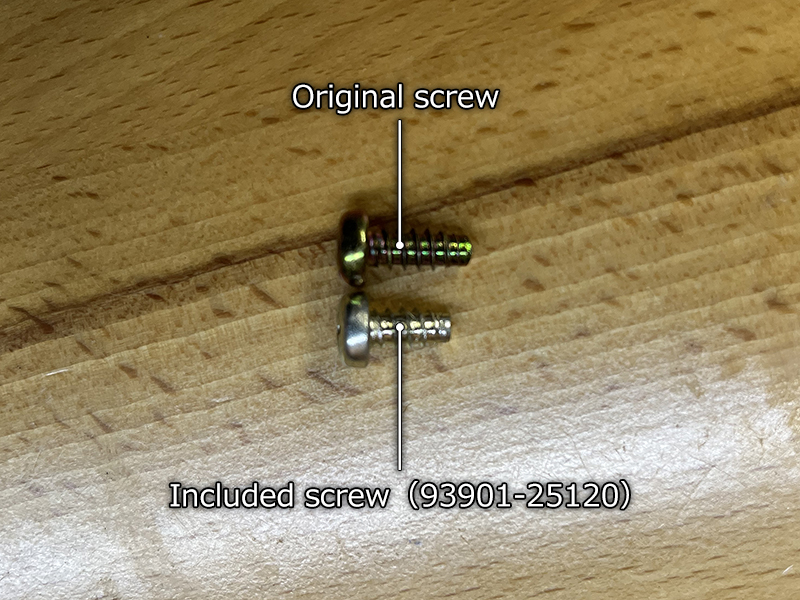
Comparison of tapping screws
-
The tank comes with a tapping screw and grommet for the floor maintenance hole cap, along with instructions recommending that they be replaced at the same time.
According to the document, the upper shape of the later-model fuel tank is different, and if the included screws and grommets are not used, they may interfere with the tank.
The original grommets all broke when I removed them, so I wasn't able to take pictures. However, comparing the screws, the included parts are shorter.
If you purchase a used tank, it is probably a good idea to replace them with the following parts.
Parts included with later tanks
| No | Part Number | Part Name | Quantity |
|---|---|---|---|
| 48 | 91604-SL0-003 | Grommet, screw 5mm | 3 |
| 52 | 93901-25120 | Screw, tapping 5x10 | 3 |
Caution: Fuel Inlet Hose Removal
Before removing the tank body, disconnect the connection points from the vehicle. First, remove the fuel pump cover on the passenger side inside the vehicle and separate the cover from the harness.
All that's left to do is remove the hoses, but it's a tedious job because the connections are in places that are hard to reach. On the passenger side are two hoses that connect to the fuel filler cap and a hose that connects to the canister, and on the driver's side are the high-pressure fuel hose and the low-pressure fuel hose that connect to the fuel filter.

Removing the fuel filler connection hose
- Remove the fuel filler connection hose on the passenger side. Both of these hoses are no longer in production and cannot be purchased, so work carefully. It is quite difficult to remove, so it is wise to remove the air cleaner box to secure work space.
- Removing the canister connection hose on the passenger side. As you can see, it comes out easily.
- Remove the driver's side high pressure fuel hose. Disconnect at the banjo bolt on the fuel filter.
- Removing the low pressure fuel hose on the driver's side. It's a little deep inside so it's hard to reach.

Canister connection hose removal

High pressure fuel hose removal

Low pressure fuel hose removal

Gasoline removal work
- Since this happened suddenly, there is quite a bit of gasoline in the tank. The fuel gauge shows a little less than half full, but considering the fuel tank capacity of the NSX, it seems to be close to 40L. It will be very difficult to get the car out of the tank unless the fuel is drained, so I drained as much gasoline as possible in advance. I thought about preparing a drain plug with a cock, but the drain bolt was small (M12 x 1.5) and there was no product that I could buy right away, so I decided to go ahead with the work. I drained the equivalent of two full 20L portable cans.
- The task of lowering the lighter tank was easy. While supporting the tank with my knees, I loosened the nuts on the fixing band and lowered it partway, then supported the tank with a jack and removed the band completely. I was worried about how to remove the tank, but it was easy with the tank on the first step of the jack stand.

Fuel tank removal complete

Early model fuel tank
- When I checked the removed fuel tank, I found that the pump lid was coated with a sticky substance, just like the new tank. If you were replacing the pump alone, you wouldn't need to apply anything to it, so I don't think it has ever been replaced since the car was new. Incidentally, the meter unit lid was also coated with the same substance.
- I removed the pump and checked the resistance between the terminals. There was no continuity. This is a rare case, but it appears the pump failed suddenly.
- When I checked the inside of the fuel tank, it was in very good condition. Rust did not seem to be related to the pump failure.

Remove the fuel pump and check

Inside the fuel tank

Early vs Late Model Fuel Tank Comparison
- Comparing the tank for the early model and the tank for the later model. Looking at the whole tank, the number of cut valves is immediately noticeable. The tank for the early model has two at both ends, while the tank for the later model has only one in the center of the tank. In addition, you can see that the position of the nipple that connects the breather tube (the thinner hose that connects to the fuel filler) is slightly closer to the fuel filler. The breather tube for the early model is too long due to the change in the position of the nipple, but there is no way to buy a compatible part. Rather than being unable to buy the part, it seems that the later model was forcibly assigned as a successor part when production of the early model tank ended, and the hoses for the early and later models do not fit, so there is no setting. The breather tube for the early model is difficult to handle, and I regret not purchasing the later model. The breather tube for the later model can be purchased separately, so I could have purchased an additional one and tested it, but I wanted to restore it quickly, so I decided to use the one for the early model.
- The filler neck tube (thick one) and breather tube (thin one) that connect to this fuel filler cap are no longer in production. The breather tube is straight so it seems like it could be replaced with a generic product, but the filler neck tube has a special shape so it seems like it would be difficult to replace it with a generic product.
- We transplanted the hoses from the removed fuel tank and installed the newly purchased 2-way valve. The bracket that secures the 2-way valve is no longer in production, so we transplanted it from the removed tank.
- For some reason, the pipe for the cut valve piping is still from the previous model, and there is a pipe for the cut valve on the passenger side that is not used. Moreover, it is only covered with tape, so it seems that the buyer is free to dispose of it and use it as they like. There is no actual harm in using it as it is, but I put a rubber cap on it just for the sake of feeling.

Filler neck tube and breather tube

Hoses transplanted to late model tank

Attach a rubber cap to the unused cut valve pipe

Body cleaning (driver's side)
- Driver's side body after cleaning. Since I figured I wouldn't be removing the fuel tank again anytime soon, I took the opportunity to clean the body thoroughly.

Cleaning the body side (passenger side)
- The passenger side body after cleaning.
Installation Is Harder
When removing the tank, it comes out easily due to its own weight, but when installing it, it is a little difficult because you have to lift it up while pulling out the hoses from the holes on both sides that connect to the engine room.
Since I worked alone, I temporarily fixed the tank at the lowest position with a fixing band, went around to the top, pulled in the hose and adjusted the direction.
I repeatedly raised the tank a little from the bottom, went around to the top and checked the hose handling.
I think it would be easy to do the work if two people accessed it from the top and bottom at the same time.
After replacing the fuel tank, I put in gasoline and turned on the ignition.
It was natural that it was restored without any problems, as everything around the fuel tank was new.
It was difficult to suddenly have the fuel pump break down, but it was a blessing (or rather, good fortune) that it broke down while it was in the garage.

Fuel tank installation complete