
This work involves cleaning the evaporator inside the heater unit and replacing the expansion valve. To remove the heater unit, the dashboard (instrument panel) will also need to be removed.
- First, remove the two tapping screws (4x12) and then remove the side vent garnish (remove both the left and right sides).
- Remove the two bolt washers (M6 x 25) that become exposed when the side vent garnish is removed (remove them on both the left and right sides).
- After removing the interior panels and surrounding parts such as the meter assembly, remove the two bolt washers (M8 x 25) that secure the column holder and the two flange nuts (M8) that secure the column body from the underside of the column. Then, lower the steering column downwards.

Removal of side vent garnish

Removal of bolts behind the side vent garnis

Steering column separation

Remove console bracket bolts
- After removing the rear console, remove the flange bolts (M6 x 10) that secure the console center bracket to the dashboard (remove them on both sides).
- Remove the M5 x 16 screws that secure the center lower bracket.
Once you remove the four floor mat fixing hooks on the inside of the dashboard, you will be able to remove the dashboard itself. - State after dashboard removal.
Removing the beam in the foreground (beam assembly, steering hanger) allows you to remove the evaporator.
This beam is made of bare iron in its original state and will rust, but it was chromate plated (trivalent chromate) when the dashboard was removed previously. As a side note, if you buy this beam new as a separate part, it seems to have a black surface treatment (it's unclear whether it's painted or plated), so there's no need to worry about rust.

Center lower bracket fixing screws

Dashboard removed
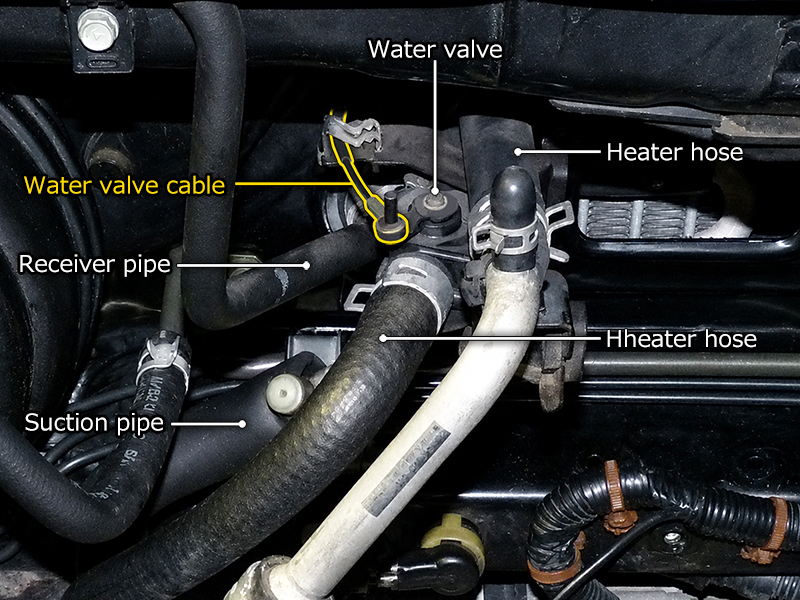
Water valve cable
- To remove the heater unit, first remove the blower assembly on the front trunk side.
Next, disconnect the heater hoses connected to the heater core and the receiver pipe and suction pipe connected to the evaporator (disconnect the water valve and water valve cable first before removing the heater hoses).

Removed heater unit
- Removed heater unit.
After separating the piping, remove the two bolt washers (M6 x 20) that secure the upper bracket of the heater unit from the interior side, and the two nut washers (M8) that secure the lower stud bolt from the front trunk side, and then remove the heater unit itself.
- The heater unit has a complex structure, so I take as many photos as possible to use as a reference during assembly. On the outer side of the unit on the driver's side, there is a linkage mechanism connected to the airflow control flap that changes the airflow path via the mode motor assembly.
- The air mix motor assembly on the bottom is a lead screw mechanism that moves the airflow control flap that blocks the flow path between the heater core and the evaporator up and down. You should take plenty of photos of this part, otherwise you might assemble it incorrectly.
- The sponge attached to the mating surfaces of the sealing plates and other parts had deteriorated over time and crumbled, so I carefully removed it and attached sponge tape purchased from a home improvement store.
At the time, there was no dedicated product available, but nowadays, T3TEC sells a custom sponge set for heater units (product number: T3-AC-HS02)open_in_new, so I think using that set is the best option.
I may never have another opportunity to remove the heater unit, so I thoroughly cleaned it using a neutral detergent.

Mode flap link mechanism

Air mix flap lead screw

Interior cleaned, sponge replaced
- This is the condition after the expansion valve replacement is complete.
The expansion valve is a component that injects refrigerant through a small nozzle to promote vaporization. Nozzle clogging problems due to metal wear particles generated from inside the compressor are common, and replacement is recommended during retrofits.
In my case, there was a possibility that the compressor was operating with insufficient refrigerant or oil, so of course I replaced it with a new one.
The evaporator was thoroughly cleaned by spraying it with parts cleaner and repeatedly shaking and blowing air through it.
The piping connected to the thermal sensing tube was bent by hand to match the original condition, and the thermal sensing tube was set into the recessed part of the pipe and secured with a clip.

Expansion valve installed

Sponge attached to sensing tube
- As with the original part, I wrapped heat-insulating sponge around the thermal sensing tube section (using EPDM sponge sheet purchased from a home improvement store).
The pipe connections were masked and protected to prevent debris from entering.

Overhaul complete
- The evaporator and heater core have been assembled into the heater unit, completing the overhaul.
Silicone grease has been applied to the moving parts such as the lead screw mechanism and gear mechanism.
The deteriorated sponges on the mating surfaces of the bulkhead opening and the air outlet have also been carefully removed and replaced.

Removed left and right condensers
- I also removed and cleaned the left and right condensers.
Similar to the evaporator, I cleaned them by spraying them with parts cleaner, shaking them, and blowing air through them repeatedly.
All other piping was also cleaned by repeatedly spraying it with parts cleaner and blowing air through it. - This is the piping connection point on the driver's side, where the condenser has been installed and the pipes connected.
The fittings on the condenser itself also showed age-related deterioration, so I was tempted to replace the condensers with new ones, but the cores themselves were still in good condition, so I reused them considering the cost.
The other piping was also assembled while replacing the O-rings with those for R134a. The service manual instructs to apply compressor oil to the threaded parts and O-rings.

Driver-side condenser connection

Receiver tank temporarily installed
- The receiver tanks for R12 and R134a have different part numbers, suggesting that the internal desiccant is also different.
Furthermore, dirt is likely to have accumulated inside after years of use, so I will replace it with a new one.
The R134a tank has a smaller diameter than the R12 tank and requires a dedicated bracket, but I hadn't purchased one because I wasn't aware of the diameter difference. Therefore, I temporarily removed the ring portion of the R12 bracket and secured it with a hose clamp. - Curious about the internal structure and the amount of dirt accumulated, I tried cutting open the R12 receiver tank that I had removed.
Inside, it was a simple structure with only a filter that looked like activated carbon.

Cut R12 receiver tank and internal filter

R12 compressor with transplanted clutch set
- The clutch set is removed from the R12 compressor and transferred to the R134a compressor.
There is a standard clearance for the flange and pulley, and the new compressor comes with shims for fine-tuning the clearance. Flange-to-Pulley Clearance ・・・ 0.35–0.65 mm I measured the clearance using a washer that came with the R12 compressor and it was 0.6mm, so I assembled it without using a shim.
I also measured the resistance value between the coupler terminals and the main body of the field core (the electromagnet part with the cord) as there is a standard value. Terminal-to-Body Resistance ・・・ 3.6±0.2Ω (20°C)
The amount of oil to add when replacing each part is specified in the service manual, taking into account the amount of oil remaining in the old part that was removed.
1992 Service Manual Oil Refill Specs| When replacing condensers ・・・・・・・・・ | 30cc |
| When replacing the cooling unit ・・・ | 60cc |
| When replacing the receiver ・・・・・・・ | 10cc |
| When replacing piping ・・・・・・・・・・・・・ | 10cc |
| When replacing the compressor ・・・・・ | 160cc - A |
A: Amount extracted from the removed compressor
(the amount of oil extracted should not exceed 50cc)
These replenishment amounts are based on the assumption that existing oil remains in the cycle, and do not apply to this case where the air conditioning cycle has been completely cleaned and the residual oil is almost zero.
Since there was no special mention of such cases in the service manual, I decided to use the oil that was sealed in the new compressor without draining it.

R134a compressor installed
- R134a compressor installed (the front beam needs to be removed to replace the compressor).