Gauge and vacuum pump setup
I used an unknown brand of manifold gauge and vacuum pump that I bought on Yahoo Auctions. The display unit is "bar," which is a bit difficult to read, but the set was a bargain at 12,480 yen (including shipping and COD fees).
- After assembling the hoses and couplers, connect the high-pressure hose (red) to the high-pressure service port (H).
R134a uses a quick-connect coupler, making it easy to attach and detach. Also, the service ports have different coupler sizes for the low-pressure and high-pressure sides (the high-pressure side is larger), so you won't connect them incorrectly. - Connect the low-pressure hose (blue) to the low-pressure service port (L).
- Connect the central charging hose (yellow) to the vacuum pump.
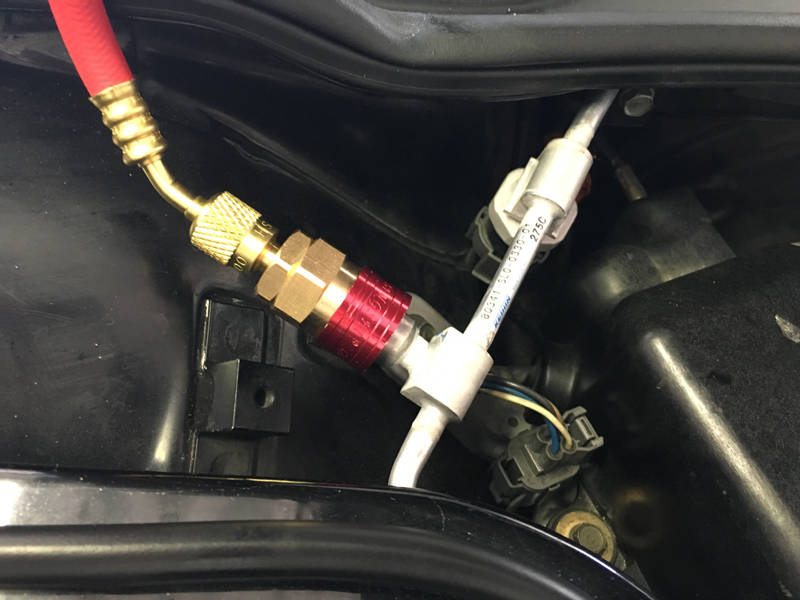
Connect red hose to high-side port
Connect blue hose to low-side port
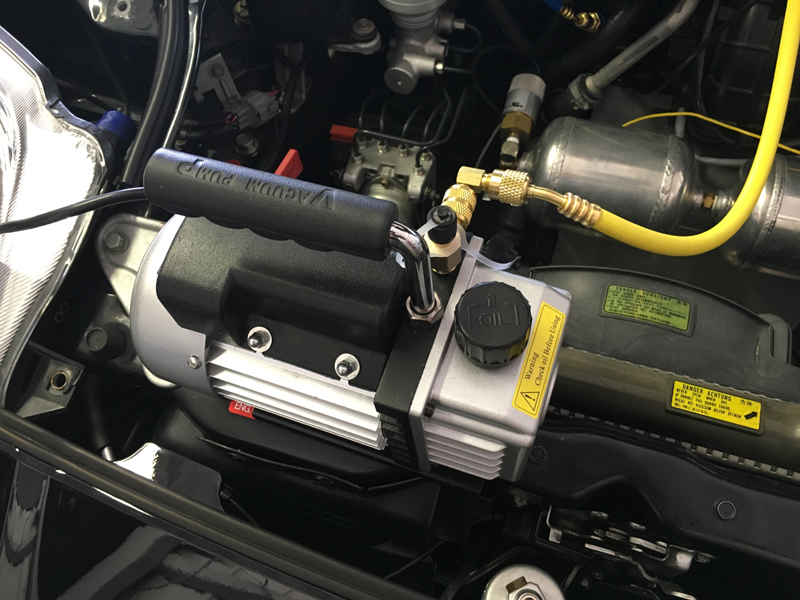
Connect yellow hose to vacuum pump
Vacuuming and leak testing
To remove any remaining air or moisture from the piping, perform a vacuum evacuation using the following procedure.
- After connecting the charging hose (yellow) to the vacuum pump, fully open both the high-pressure valve and the low-pressure valve to start the vacuum pump.
- As soon as you start vacuuming, the gauge will swing all the way to the negative pressure side, but continue vacuuming for about 15 minutes.
- After fully closing both the high-pressure and low-pressure valves, monitor the negative pressure on the gauge.
Leave it for 5 minutes and confirm that there is no change in negative pressure to complete the leak check.
Checking piping for leaks
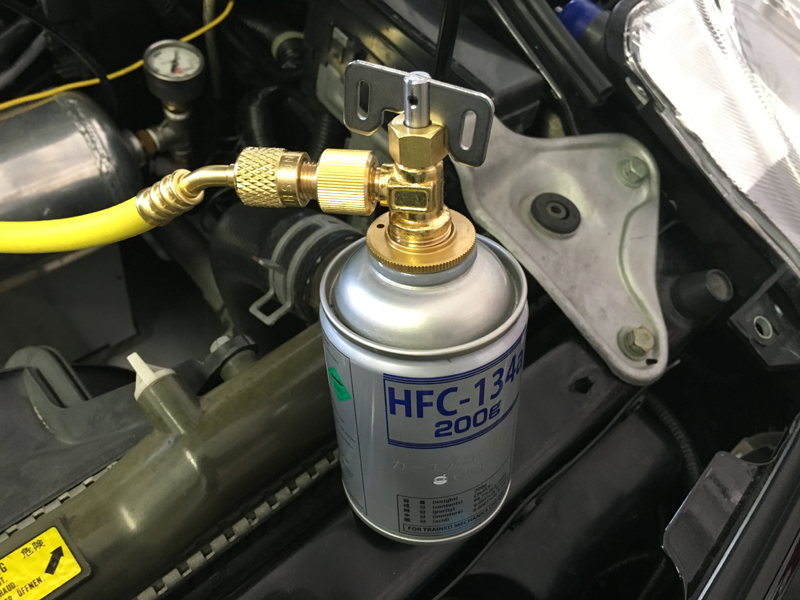
Connect can and charge refrigerant
The service manual specifies a refrigerant charge amount of 850g (+0/-50g), so I prepared five 200g service cans.
The valve for connecting the service cans that came with the manifold gauge set was not screw-in type and came off easily, so I purchased additional screw-in type valves to use.
- Connect the service can to the charging hose (yellow) and open the valve on the can.
Then, press the purge valve at the base of the charging hose on the gauge body side to expel the air from the hose and gauge.
Next, open the high-pressure valve and fill with refrigerant until the pressure on the low-pressure gauge reaches 1 kg/cm2.
The service manual instructs to use a leak tester at this point to check for leaks and confirm that there are no leaks, but I will omit this step this time.
Connect can to yellow charging hose

A/C ON, 18℃, recirc, fan MAX
Start engine, charge refrigerant
- Ensure the high-pressure valve is closed, then start the engine and keep the engine speed below 1500 rpm.
Next, with the doors and windows fully open, set the air conditioner to the following settings, then open the low-pressure valve and inject the refrigerant. A/C settings
Set temperature ・・・・・・・・・ 18℃
Fresh/Recirc Switch ・・・・・ Recirculation
Mode switch ・・・・・・・・・・・・・ Front vent mode
Fan switch (air vol.) ・・・ Max
A/C switch ・・・・・・・・・・・・・・ ON
When the can is empty, repeat the following steps: "Close the low-pressure valve and replace the can" → "Press the purge valve to purge the air from inside the gauge" → "Open the low-pressure valve and refill with refrigerant".
Charge until pressure is normal
The service manual includes a graph showing the standard measurement values (inspection data) for determining normal operation. It is believed that R134a was adopted in 1992, but in the inspection data from November 1992, the lines for humidity from 30% to 80% are shown in 10% increments, whereas in the inspection data from 2001, they are shown as a solid color range. Looking at the discharge air temperature data, the discharge air temperature is higher in 2001 than in 1992, which might suggest a may appear that performance has decreased. However, since 1992 was the early stage of the transition from R12 to R134a, I think the values are based on ideal values, while the 2001 values reflect actual operational standards based on real vehicle data.
* For comparison purposes, the December 2001 inspection data includes a line overlaid with the 1992 data.
The service manual includes examples of measurement results (below) that can be used to determine if the refrigerant cycle is functioning correctly.
However, the slight discrepancies with the inspection data indicate that these are somewhat ambiguous criteria. Since
temperature and humidity measurements are likely to vary depending on the measurement conditions, we will consider the system to be functioning correctly if each value falls within the appropriate range for the inspection data and cool air is being emitted.
* The values for the measurement example are indicated by red circles in the inspection data from December 2001.
Example of normal operation(December 2001 service manual)
| Intake Temp. ・・・・・・・・・・ | (dry) 30℃ | } | 70% RH |
| (wet) 25.5℃ | |||
| Outlet Temp. ・・・・・・・・・ | 21℃ | ||
| Discharge pressure ・・・ | 2.07MPa(21kg/cm²) | ||
| Intake pressure ・・・・・・ | 0.31MPa(3.2kg/cm²) | ||
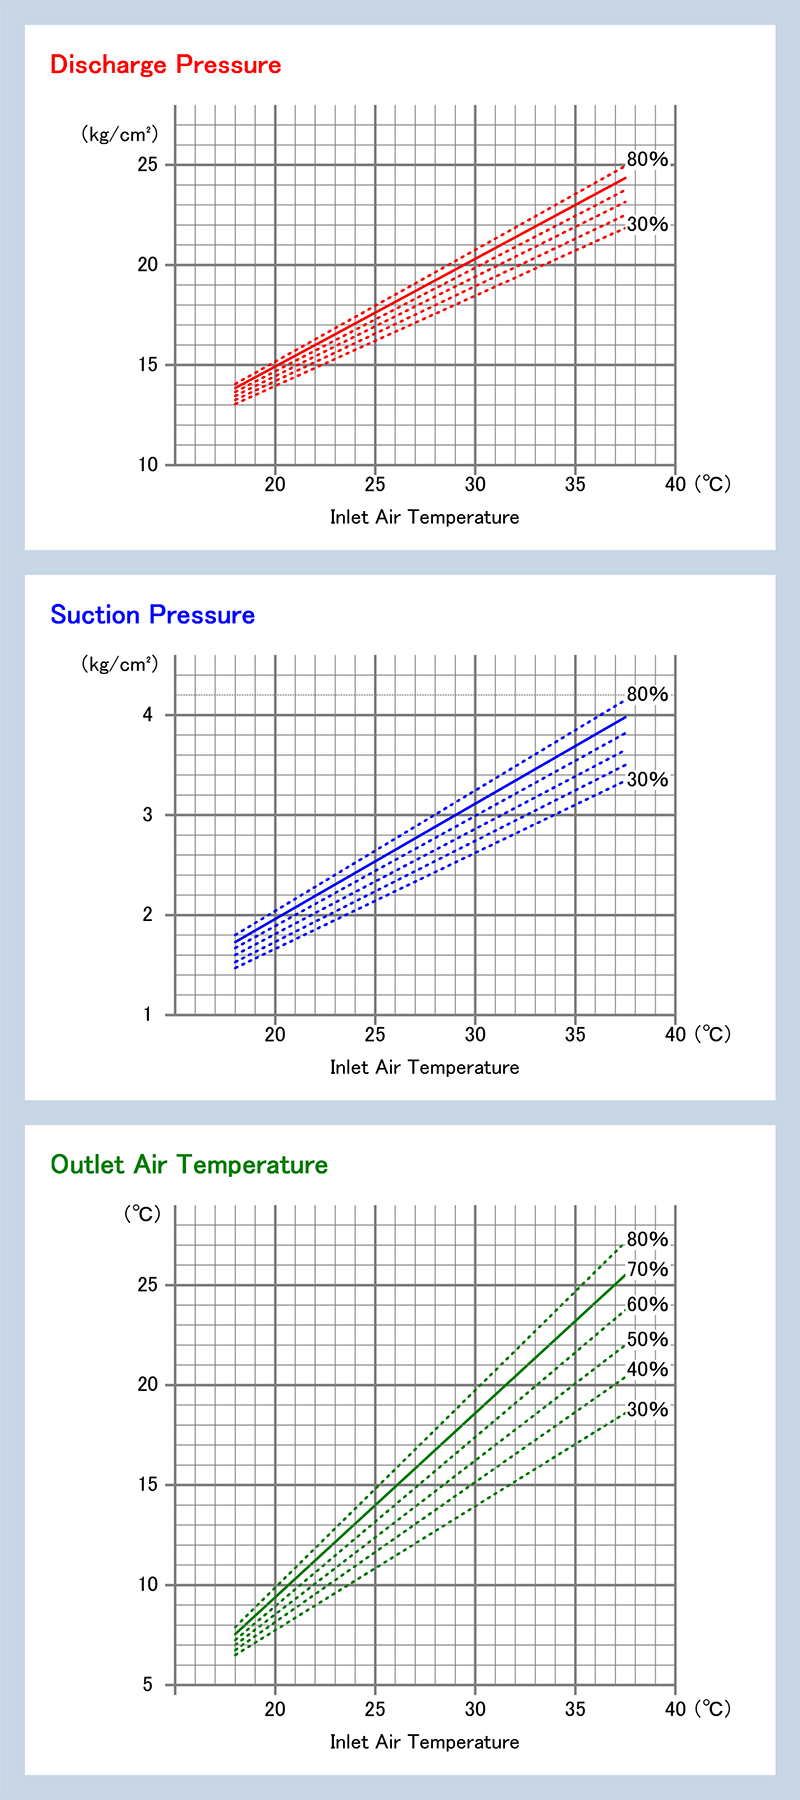
Inspection data (November 1992)
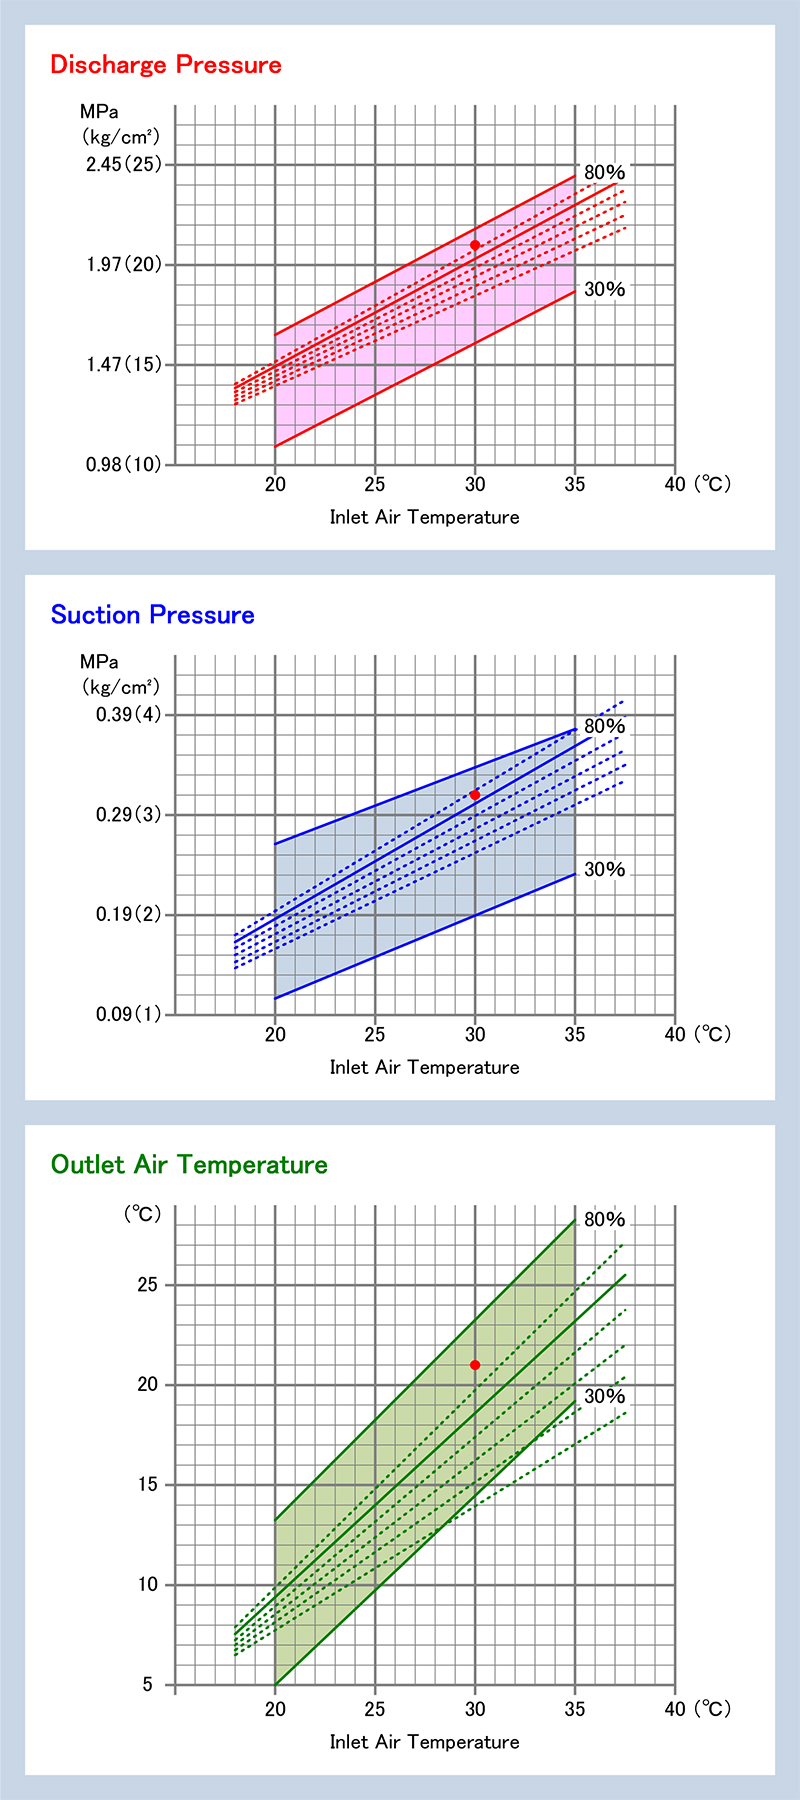
Inspection data (December 2001)
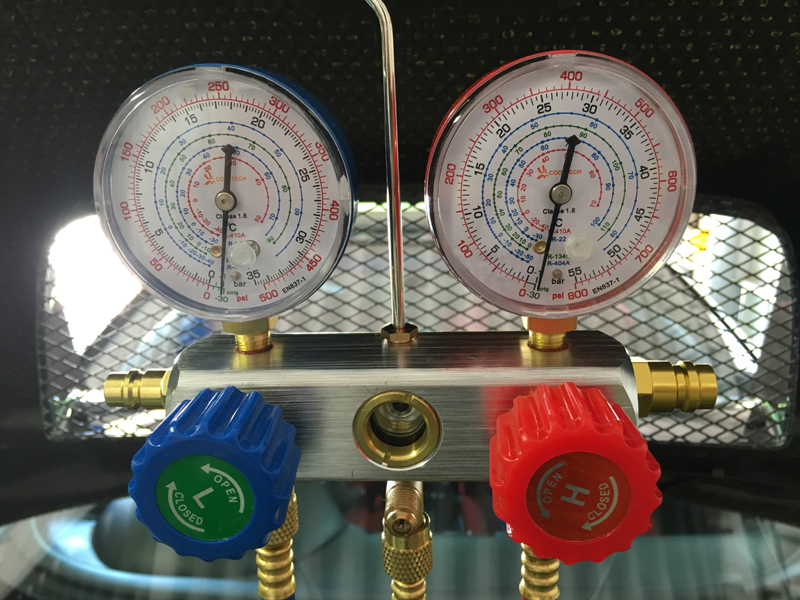
Check condition by gauge pressure
- Once the pressure was within the normal range according to the inspection data, the low-pressure valve was closed and the engine was kept running at 1500 rpm for 10 minutes (it was within the normal range after injecting about four and a half 200g cans of refrigerant).
After 10 minutes of operation, the gauge pressure was displayed as follows (the garage temperature at the time of measurement was approximately 30°C):
・ High: 17.5 bar (17.85 kg/cm²)
・ Low: 2.0 bar (2.04 kg/cm²)
low-pressure side is slightly lower compared to the inspection data, but cold air is coming out, so it seems to be okay.
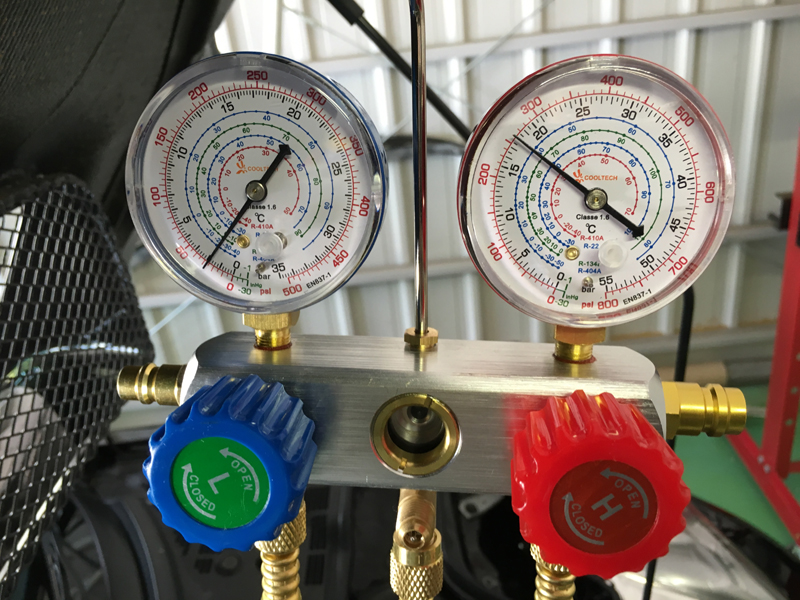
Approx. 2.0/17.5 bar low/high pressure