
Aftermarket Speakers Bad Choice?
I'd been driving my car for a long time with a combination of aftermarket speakers and a baffle, but the sound felt muffled and lacked clarity, which left me dissatisfied.
previously tried deadening but failed to significantly improve the sound, so I suspected the problem was not due to the insufficient performance of the aftermarket speakers themselves, but rather to the door materials, mass, and interior conditions that differed from those of a typical vehicle.
Therefore, I decided that a system using an enclosure specifically designed for the NSX would be more advantageous.
I searched for a compatible unit with an impedance of 4 ohms and the same mounting dimensions as the original Bose speakers, and found that the mounting dimensions of Bose's three-point 11.5cm units were generally compatible. I
then turned my attention to the "101RD" model, which is often used in cars.
However, this model has internal circuitry for sound correction and networking, and the speaker impedance is 8 ohms, making it unsuitable for direct connection to a deck.
111CL Series as a Replacement
I wanted to select a model with an impedance of 4Ω, so I did some research and found that although it is a product rated for in-ceiling and wall installation, there is a 4Ω model in the "111CL" series.
The 111CL series has evolved into the CL-S, CL-II, and CL-III, with the CL-III being the newest model.
I was able to confirm that the CL-S and CL-II are available in 6Ω and 4Ω models, but the CL-III is only available in 6Ω, and the moisture-proof model, the CL-TIII, is only available in 4Ω.
It appears that the moisture-proof model of the CL-II, the CL-TII, is also only available in 4Ω, so my choices narrow down to three models: the CL-II (4Ω), the CL-TII, and the CL-TIII.
Furthermore, to briefly summarize the characteristics of these three models, the CL-TIII has a PP (polypropylene) cone that has little unnecessary resonance (early lots also have coated paper cones) and tends to produce a tight, compact sound, the CL-II has a paper cone that tends to give more volume to the bass and a fuller sound, and the CL-TII has a coated paper cone and has a character that is somewhere between the CL-II and CL-TIII.
Verifying the Genuine Enclosure
- To understand the characteristics of the factory door enclosure, I removed all components, including the speakers and amplifier, poured water into it, and measured its volume, as well as the diameter and length of the slot duct.
The volume of the main body (excluding the slot duct) was approximately 2000cc, and the slot duct section was approximately 100cc. The dimensions of the slot duct were a capsule-shaped cross section of 36mm x 17mm, and a length of approximately 180mm.
Judging from these specifications, I surmise that the design is not primarily aimed at reproducing extremely low frequencies, but rather is tuned to compensate for the volume of the mid-range within the constraints of the vehicle interior. (*)
Because the enclosure itself has characteristics favoring the mid-range, I considered the "CL-T III" speaker to be the most balanced, as it is believed to avoid excessively forward-focused mid-low range volume.* Characteristics predicted by inputting measurement data into ChatGPT.
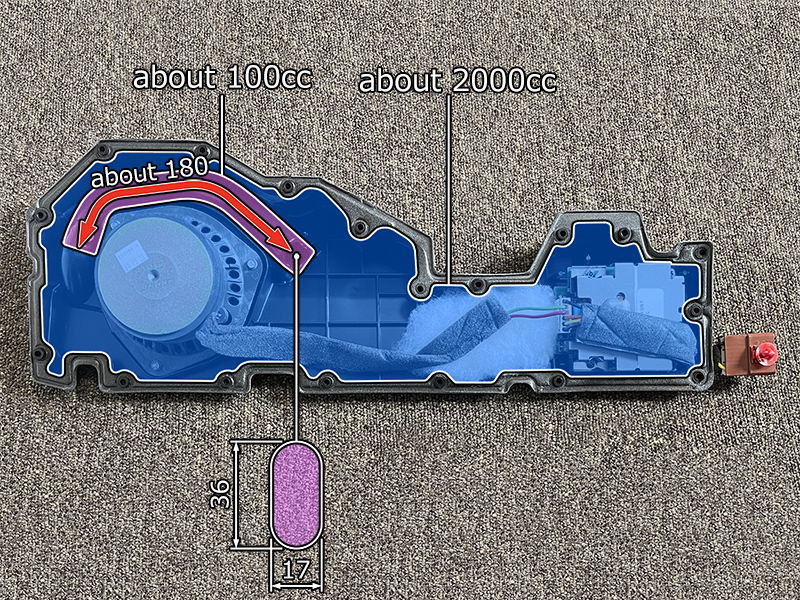
BOSE Enclosure Volume & Slot Dimensions/p>

BOSE 111CL-TⅢ exterior
- I bought these used on Yahoo! Auctions.
They look very large on the outside, but the enclosure is just large; the speakers inside are 11.5cm units.
The serial numbers for the two units I purchased are consecutive: 4020641 and 4020642. - When I removed the net and checked the speaker, I found that it was a model with a PP cone. I don't know at what serial number the change from a coated paper cone to a PP cone occurred, but while I was looking for speakers, I came across a CL-TIII with serial number 1040XXX, which had the same coated paper cone as the CL-TII.
- When I removed the speaker, I found a round sheet made of a material similar to a clear file attached to the back of the speaker to direct the airflow horizontally.
This sheet interferes with the NSX's original door enclosure, which has a recess of the same shape on the back of the speaker, so we removed it.

BOSE 111CL-TⅢ without net

BOSE 111CL-TⅢ speaker rear rectifier

BOSE 111CL-TⅢ Sound output check on a desk
- Not wanting to install the speaker in my vehicle only to find out it doesn't work, I connected the CL-TIII directly to a spare deck I had been using previously and checked it on my desk to see if it would work properly. When
the speaker was pointed upwards, as shown in the photo, the sound was muffled, but when I placed it facing me, the sound was clear, confirming that it worked without any problems.
As a test, I removed the speaker from the enclosure and played it on its own, but without the enclosure, the sound was muffled and completely lost its clarity.
While the orientation of the speaker has a significant impact on sound quality, it's clear that the enclosure itself is the element that determines most of the sound quality.
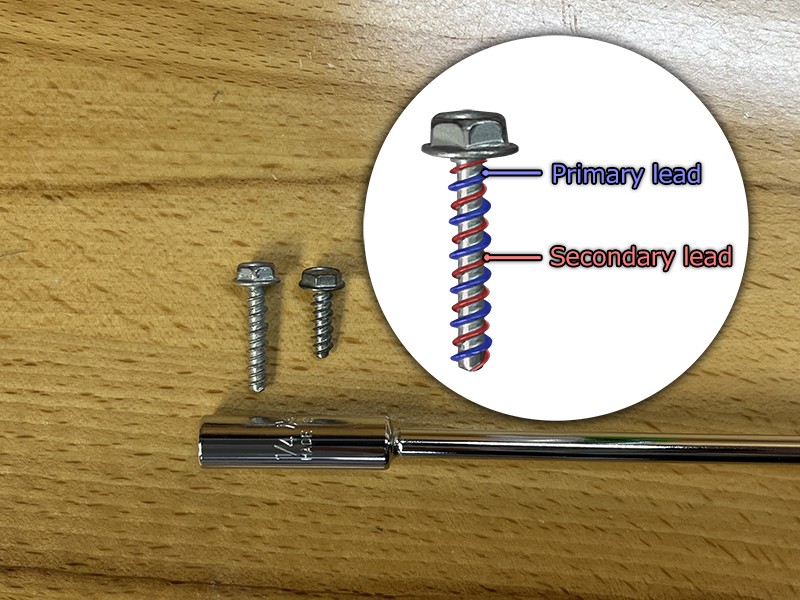
Special screws used in genuine BOSE enclosures
- The screws used in genuine Bose enclosures have 1/4-inch hex heads, so you'll need to prepare a 1/4-inch socket beforehand.
I wanted to replace the screws, but their specifications were so unusual that I couldn't find them anywhere.
After measuring the dimensions of each part and researching, I discovered that the screws were #8 size, dual-thread (dual-lead) high-low screws.
Dual-lead high-low screws are special screws with two parallel threads of different heights, with the higher threads acting as a pull-in, and the lower threads acting as a guide and prevent cracking of the resin.
Because the threads are parallel, the lead per rotation is approximately twice that of a standard single-thread screw, allowing for fewer turns. However, the pitch and thread shape are significantly different from those of tapping screws commonly sold in Japan.
Using standard screws forcibly could damage the thread shape on the resin, so care must be taken not to lose them when removing the screws.

Flange shape of BOSE 111CL-TⅢ (PP cone)
- The PP cone model has a different cone fixing structure than other models.
In the paper cone model, the cone is directly glued to the flange, but in the PP cone model, the cone is sandwiched between a resin ring.
Because the NSX door enclosure is designed to fix the speaker from the inside, the ring on the PP cone interferes with the ring on the enclosure side, and it does not fit all the way in like the factory speaker.
The paper cone CL-T II (early CL-T III model) has the same flange shape as the factory BOSE speaker, making it easier to install than the PP cone model.

4mm spacer for installing CL-TⅢ (PP cone)
- If the CL-TIII were installed as is, excessive force would be applied to the flange, so I decided to install it using a 4mm spacer for M6.
The spacer protrudes about 0.5mm from the flange surface, allowing me to adequately compress the cushion tape I applied to improve airtightness.
Additionally, the three screws securing the speaker are shorter than the 17 screws securing the outer periphery of the original enclosure.
When installing the CL-TIII, the flange interference would shift the mounting surface back by about 4mm, so I used some longer screws I had stored.

111CL-TⅢ Installed with Cotton Inside
- The factory-fit enclosure is stuffed with cotton between the speaker and the amplifier and at the back of the speaker. (*)
After using ChatGPT to determine how to arrange the padding with the amplifier removed, I found it best to use the same amount of cotton as the factory-fit pad at the amplifier, with a lighter, more generous amount around the amplifier, and then increase or decrease the amount at the back of the speaker depending on the sound quality. Since it would be a pain to adjust the amount after installation, we decided to use less cotton behind the speaker, which is considered less risky. Since we couldn't find a genuine sponge to prevent resonance in the wiring, we used gap tape from a hardware store. We used
Sumitomo Wiring Systems HD series connectors to resemble the factory ones.
The red clip used to secure the coupler is available as a genuine Honda part (clip coupler 91555-SM4-003).* When I checked the used enclosures I obtained, some had cotton on the back and some did not, so I'm not sure if it was included when new.

111CL-TⅢ enclosure replacement complete
- Assembly is complete once you attach the 17 screws and close the enclosure.
The dual lead screws certainly require fewer turns to tighten, which seems to have a significant impact on ease of assembly. The
only difference in appearance from the original is that the cone part visible through the lattice is made of white PP. - To emphasize that it is a 111CL-TIII conversion specification, I pasted a label that I had peeled off from the 111CL-TIII enclosure in the place where the original label was. This
gives it the appearance of being a genuine product, as if it were originally a 111CL-TIII specification. - To compare the standard 111CL-TIII with the NSX genuine enclosure, we performed a test playback on a desk.
Although the enclosure volume is much smaller, the sound quality remains clear and there is no noticeable difference.

111CL-TⅢ Label Transferred

111CL-TⅢ replacement enclosure playback test

111CL-TⅢ Enclosure – Install & Playback Test
- When I installed the CL-TIII in a vehicle and performed a test playback, there was a slight drop in sound quality compared to when I tested it on a desk facing forward, but compared to when I used an aftermarket 17cm speaker with a baffle, there was no muffled or blurred feeling at all, and the sound quality was clear and beautiful.
Because each range of sound is distinct, the impression changes considerably by changing the equalizer settings. I was hoping that by placing the CL-TIII in an enclosure with a mid-range-oriented characteristic, the high frequencies would be compensated for, but when listening in a flat state, the mid-low range was quite strong, and it seemed that the characteristics of the enclosure were more pronounced than those of the speaker alone.
From here on, it's a matter of preference, but I felt that the sound became clearer and more beautiful when I increased the equalizer setting as the high frequencies became stronger.