
Direct HU–Woofer Connection
Previously, when adding a subwoofer, it was common to connect the woofer via an external amplifier using the RCA output.
However, recent third-party head units have the ability to directly connect and drive a 4Ω woofer, so if deep bass is not a priority, direct driving is sufficient.
111CL Replacement Option
The original BOSE subwoofer uses the same driver (speaker unit) as the door speakers, so it can be replaced with the 111CL series.
Therefore, I decided to purchase the 111CL-TIII, which has the same PP cone as the door speakers, and use that instead.

Inside the genuine BOSE subwoofer enclosure
- When I opened the enclosure, I found that the wiring was connected to the speaker unit via the amplifier board, just like the door speakers.
I was going to replace it with a 111CL-TIII speaker unit with an impedance of 4 ohms, so I removed the amplifier.
There was cotton inside, but it seemed to be wrapped around the wiring, so I wasn't sure how it was originally set up.

111CL-TⅢ Installed in Original Enclosure
- This shows the CL-TⅢ speaker unit installed.
To match the orientation of the original dust cap lead joints when viewed from the front, I prioritized their positioning during installation, which resulted in slightly indirect wiring.
As with the door speakers, gap tape was applied for vibration control, and the original acoustic cotton was placed directly behind the speaker.

1111CL-TⅢ Subwoofer Replacement Completed
- The enclosure is closed with 14 screws to complete the assembly.
The connector is the same Sumitomo Wiring Systems HD series as the door speakers.

111CL-TⅢ Subwoofer – Label Applied
- As with the door speakers, simply attach the label peeled off from the CL-TIII to the original label position and you're done.
- My carrozzeria
FH-8500DVSopen_in_new
The DS-1000 features the ability to directly drive a 4Ω subwoofer using the rear speaker output.
You can connect a 4Ω woofer to each of the left and right outputs ("Connection Method ①" in the image), or connect a 4Ω woofer in parallel to the right output only ("Connection Method ②" in the image).
Using "Connection Method ②," connecting only one subwoofer without connecting two in parallel will increase the impedance from 2Ω to 4Ω. However, this increase in impedance reduces the load on the amplifier, so there is no risk of malfunction. When connecting a 4Ω speaker unit to a head unit designed for 2Ω, the maximum output theoretically drops, reducing the fullness in the mid-low range, but it appears to increase clarity, so there should be no problems in terms of sound quality.
Since "Connection Method ①" connects two units via separate lines, there may be differences between the two outputs. However, since "Connection Method ②" assumes a single line output, I chose "Connection Method ②" because I assumed the output was combined into mono.
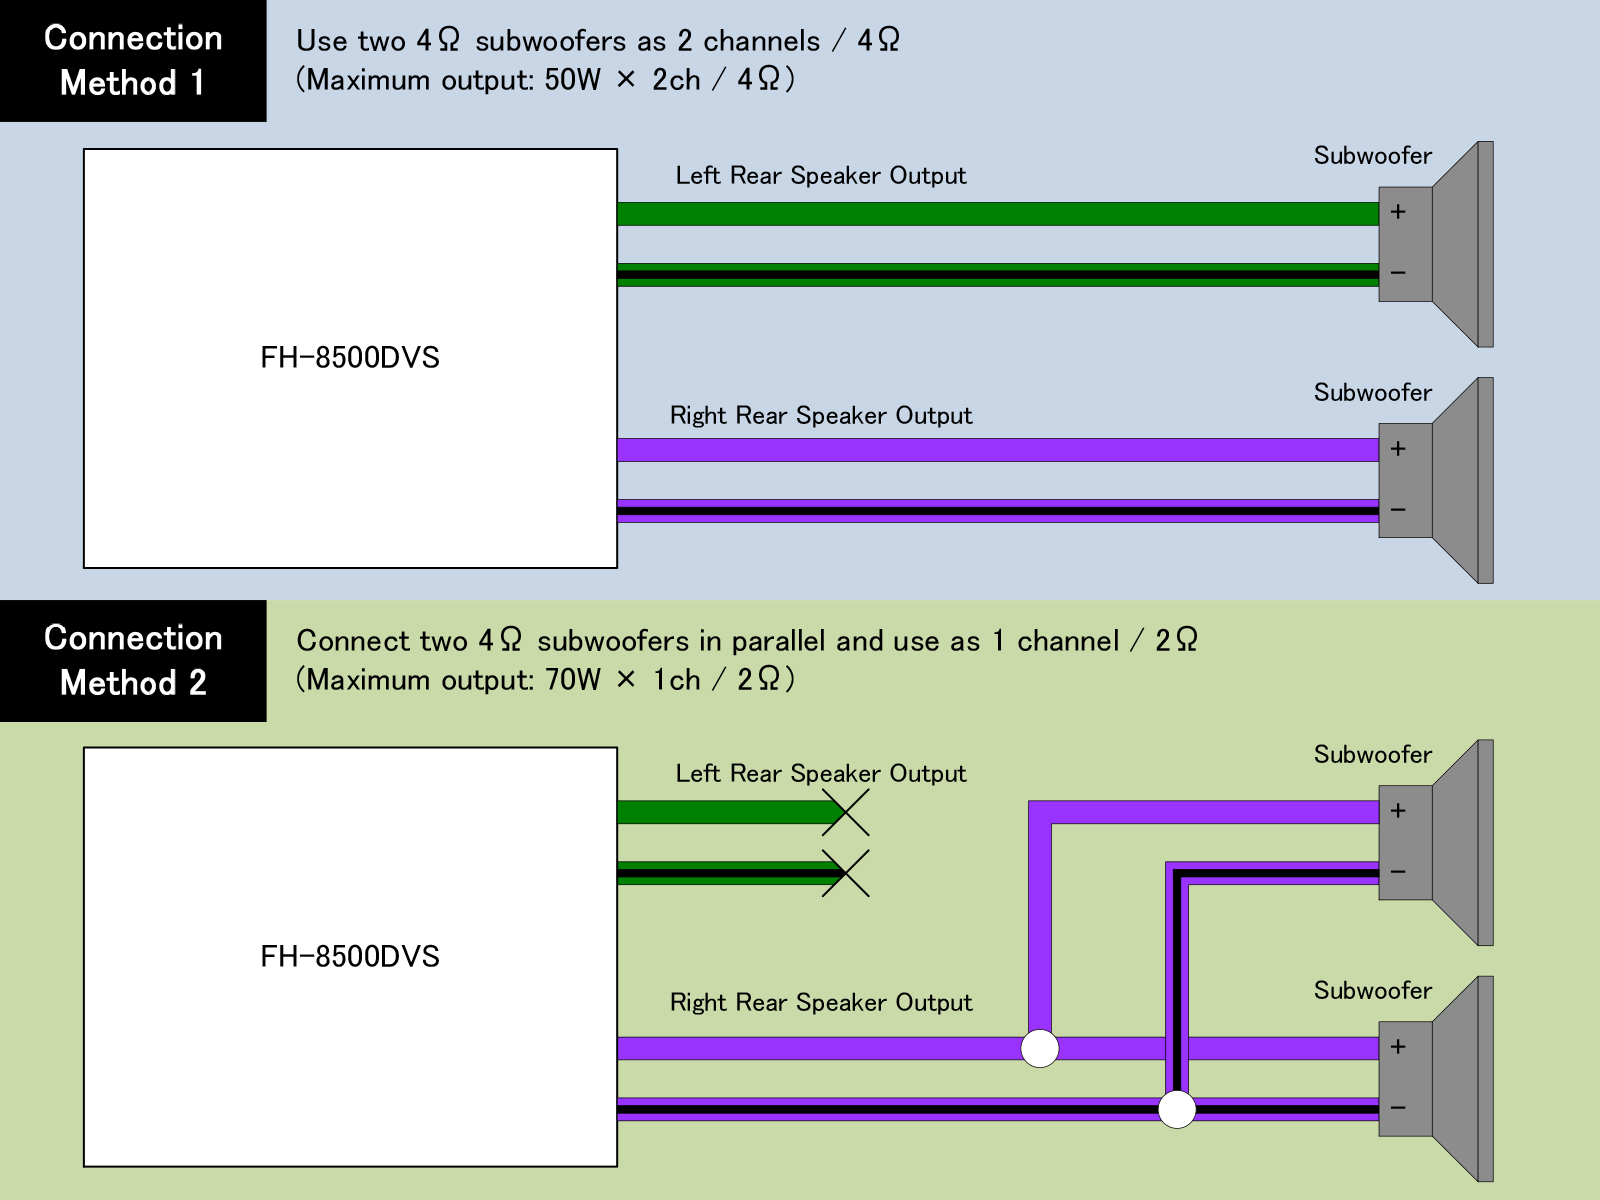
FH-8500DVS Subwoofer Connection

Subwoofer Installed at Passenger Footwell
- The "Cutoff" function applies a low-pass filter to the left and right door speakers, cutting low frequencies, and a high-pass filter to the subwoofer, cutting high frequencies.
owever, even when I applied the cutoff function with the other settings left at their defaults, my ears couldn't really tell the difference.
Increasing the subwoofer output with the "Speaker Output Level" setting or emphasizing the bass with the "Bass Boost" setting clearly made a difference, but all I noticed was a louder "thump" of bass, and I couldn't tell if that made the sound better.
Changing the "Loudness" (*1) or "Sound Retriever" (*2) settings clearly made the sound clearer, so adding a subwoofer didn't make much of a difference to me.*1 A function that corrects the lack of low and high frequencies when playing at a lower volume, resulting in a clearer sound.
*2 A function that complements the sound lost during compression, restoring and reproducing the lingering resonance, dynamism, and spaciousness of music.